|
I know a certain little girl who loves all things Minnie Mouse, so for her birthday this year I decided to make a bow-tique card for her! This was inspired by Mendi when I saw her using this bow from the Sunny Studio Christmas stamp set for a non-holiday card. 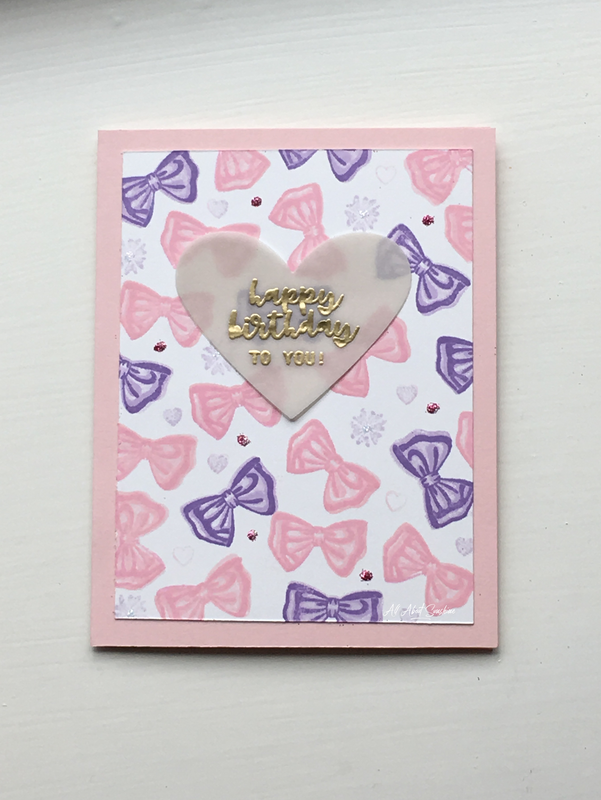 Compensated Affiliate Links are denoted below with an asterisk "*" at no cost to you. Other, non-Affiliate Links are also provided for your convenience! All supplies were personally purchased, and all opinions expressed are my own. Supplies:
The bow is a 3-layered stamp, so start by stamping the solid image with your lightest color ink, making your way to the least solid image with your darkest shade of ink. I tested my ink colors on scratch paper to see how they layer together before starting this card. Keep in mind that most dye inks take time to absorb into the paper, so it may be a few minutes before you see how it will actually look. Next I filled in the open spaces with little hearts and flowers from the Jillibean Soup Latte Love stamp using the lightest shades of pink and purple. I added dots of Stickles and covered some of them with pink glitter. For the sentiment I layered 3 vellum hearts together so that the background didn't distract from the sentiment. Here's a look at the inside of the card, where I used a couple stamps from the Love Cynthia Hey Hey! Happy Birthday! stamp set. I haven't experienced with masking very much, but this was so easy... First, I stamped the "6" onto a piece of scrap paper and cut it out. Next, I stamped the "6" on my card. Finally, I placed the cut out "6" on top of my stamped "6" before stamping the cake on top. The results are lovely! 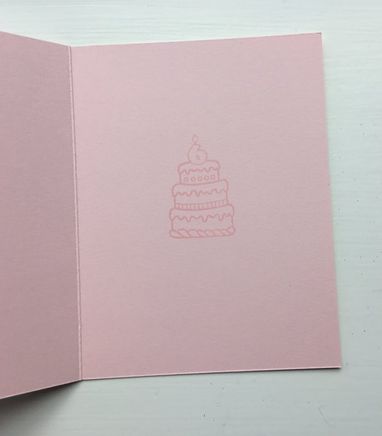 If you've never tried masking while stamping, start small and give it a go!
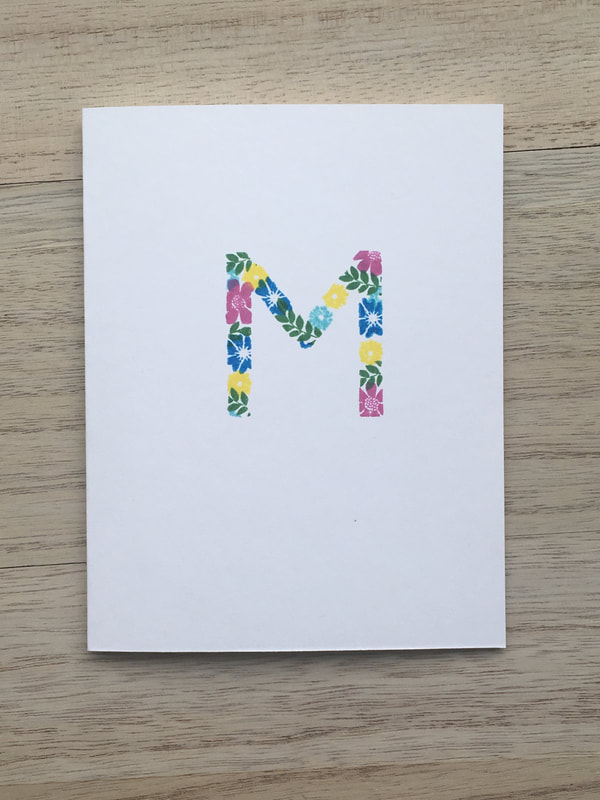
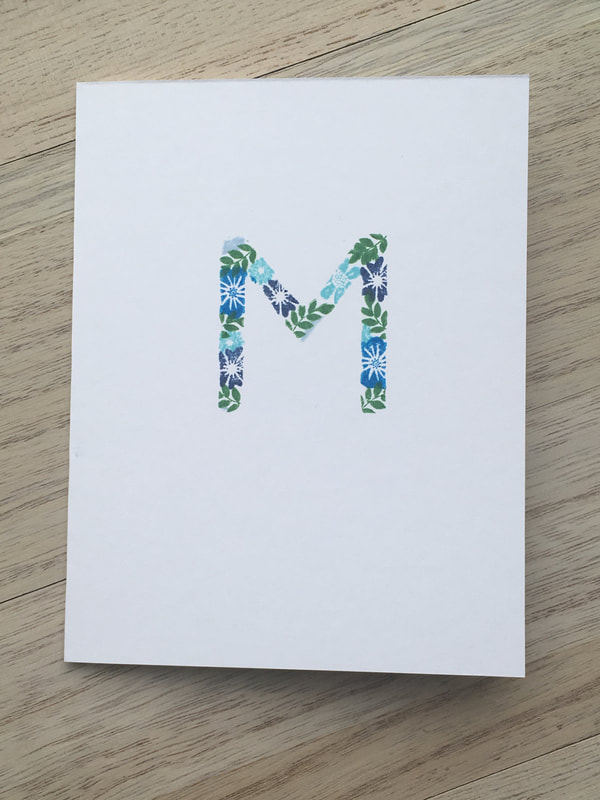
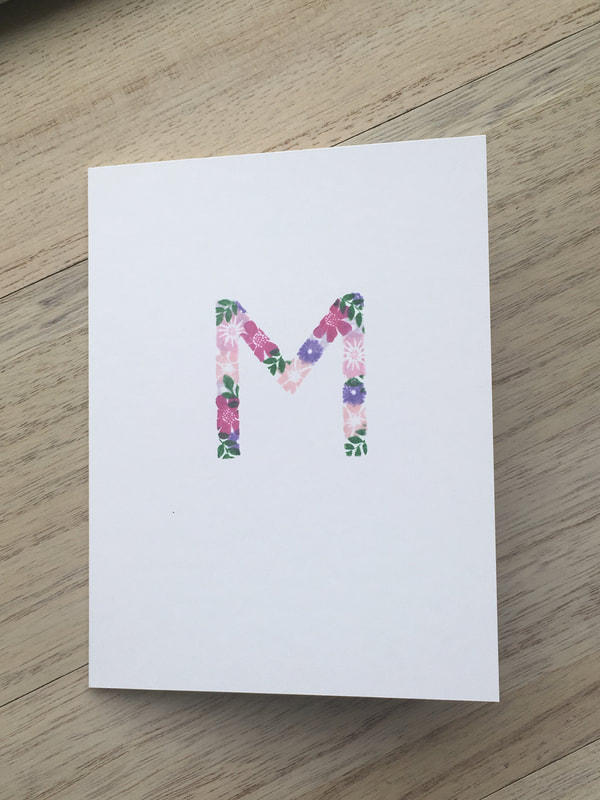
Have a great week!! My friend was celebrating her birthday and she loves to send mail, so I decided to make some handmade initial note cards to give her. 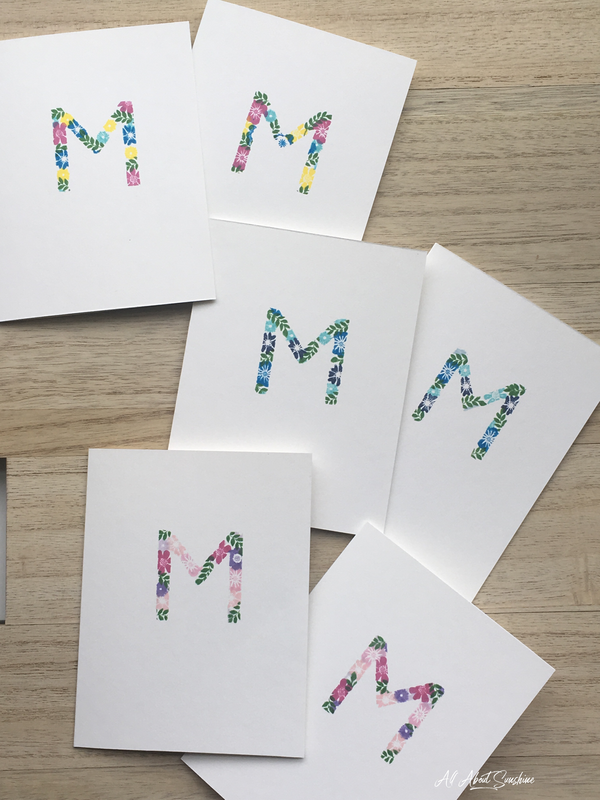
Compensated Affiliate Links are denoted below with an asterisk "*" at no cost to you. Other, non-Affiliate Links are also provided for your convenience! All supplies were personally purchased, and all opinions expressed are my own. Supplies:
First, I cut the 'M' from a piece of A2 cardstock using my Silhouette Cameo -- this will serve as a stencil/mask for stamping. The font I used is Gills Sans. I love the Jillibean Soup Latte Love stamp set for many reasons, one being that it includes several unique tiny flower stamps. I also love the fern stamps included in this set. I stamped the ferns first using MFT's Field Day ink. Then I filled in the open spaces using different colors of ink and various flowers from the stamp set. I love how they turned out! The next time you need a gift, try making a set of note cards!
It's a little gloomy today with lots of rain and clouds, so I decided to pull out my *new* Stormy Sky Distress Oxide Ink and my Happy Girl stamps. 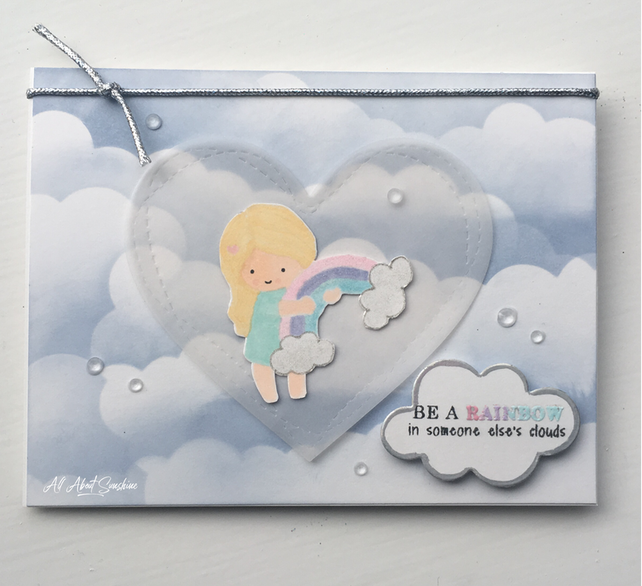 This is my first time experimenting with "no line coloring", but it seemed appropriate here and I ended up loving it so much! I used My Favorite Things Grout Hybrid ink and it was perfect. 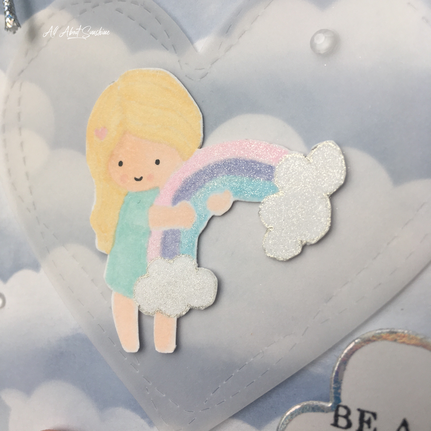 Compensated Affiliate Links are denoted below with an asterisk "*" at no cost to you. Other, non-Affiliate Links are also provided for your convenience! All supplies were personally purchased, and all opinions expressed are my own. Supplies:
BG11, YR31, R20, E53, & E00
I am SO HAPPY that the Love Cynthia shop is now re-opened! There are 7 new sets for the September release, as well as the brand new Giggles planner stickers. Be sure and check out the Facebook page for discount codes and sneak peaks! The latest Distress Oxide release from Tim Holtz contains so many of my favorite colors! This Stormy Sky is perfect for the cloudy sky, and was the starting idea for this card. I pulled out my Grout Hybrid ink from MFT and started experimenting with no line coloring using Copic markers. This method of coloring turned out to be much more fun than I imagined! I fussy cut the happy girl and layered the image over a vellum heart cut from the Simon Says Stamp Wonky Hearts die set. Next, I die cut the little cloud then traced the edges with the new Heidi Swapp fine tip glue pen. Using my Minc, I foiled the cloud to give it a silver lining ;) using Heidi Swapp's Iridescent foil. After foiling, I stamped the sentiment without the "rainbow", then stamped the word "rainbow" using Versamark ink so that I could heat emboss on top. The cloud is popped up with foam adhesive. To finish off the card I added some ribbon and little gems. Thanks for stopping by!
One of my fellow volunteers is moving on from the organization we volunteer at, so I made this card to let her know how much she is appreciated for all of her contributions! When I think of my friend, I think of her trendy black jeans, white tee, and her bright & bold personality that emanates pops of pink...that is the inspiration behind this card. 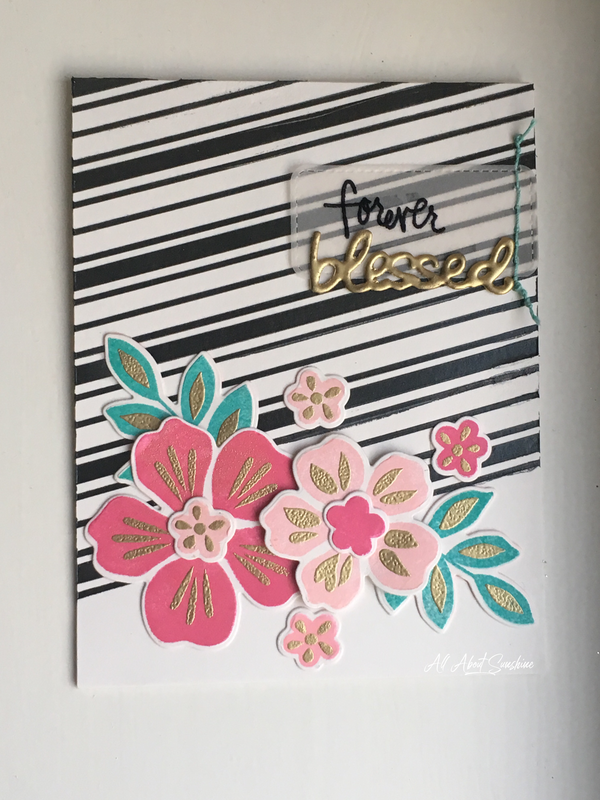 Compensated Affiliate Links are denoted below with an asterisk "*" at no cost to you. Other, non-Affiliate Links are also provided for your convenience! All supplies were personally purchased, and all opinions expressed are my own. Supplies:
To make the base, simply tape your stencil to both your panel and your work surface, then apply the texture paste. Allow adequate time for the texture paste to dry, and be sure to clean your stencil with soap and water ASAP! Next it's time to build the florals. I used the My Favorite Things Flashy Florals stamp and die sets paired with Ranger and MFT dye inks, then heat embossed the 2nd layer with Princess Gold embossing powder. The Flashy Florals set may be hard to come by, but ANY floral stamp & die will work! MFT has many lovely layering flower sets to choose from. Some of the flowers I adhered using foam tape, the rest I stuck down with Be Creative tape. I wanted a custom phrase for this card "forever blessed...because of you", and thankfully I was able to come up with those words using a combination of stamps and dies! I heat embossed the "forever" using Super Fine Black Embossing Powder, and I heat embossed the "blessed" die cut with 3 layers of Princess Gold Embossing Powder. I love the bubble affect this gives! I added them to vellum, then sewed it down using my Stitch Happy sewing machine and Stitch Happy Aqua thread. Super easy! The rest of my sentiment is on the inside of the card. :) Try turning your stencil 45 degrees for a different look! Thanks for visiting! Have a lovely day! I have been searching everywhere for different colors of gilding flakes and finally found some on Amazon! This is a great option for adding foil without a foiling machine. I decided to play with the gilding sheets utilizing the Queen & Co. Star Shaped Shaker kit. 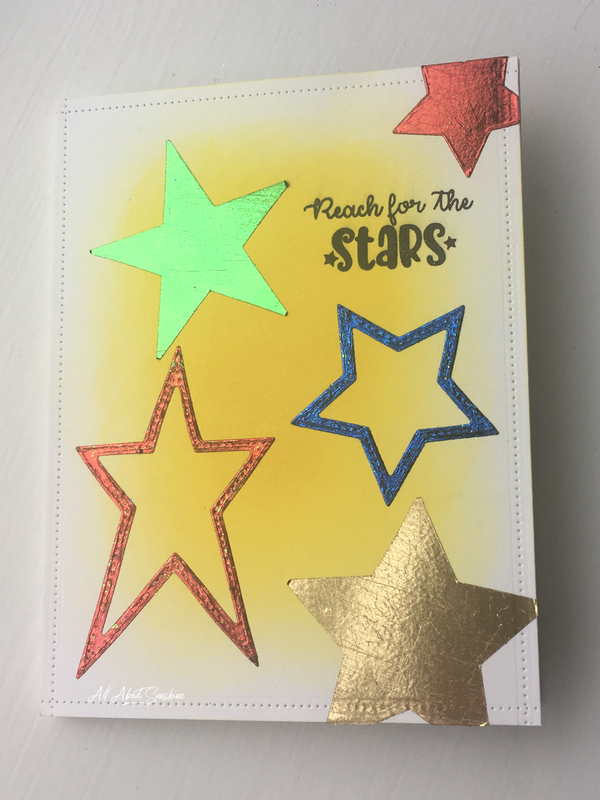 Supplies:
Mustard Seed is my all-time favorite yellow of the Distress inks, so I was so excited when it was released as a Distress Oxide color! Using a mini ink blending tool, I inked up my Bristol smooth paper and faded out toward the edges. Next, I used the dotted border die from Lawn Fawn to create the border. Queen & Co. offered an amazing 4th of July sale, and that's when I picked up this Star Shaped kit. It's great! I die cut a few of the stars from Silhouette's double sided adhesive sheets, and I ended up with both frames and full stars. I placed one star at a time onto my card base, removed the top adhesive sheet, then placed a sheet of gold leaf (various colors) on top of the exposed adhesive. TIP: Gold Leaf is very messy so I did this inside a small cardboard box to make sure I could contain the crumbs. Typically I create with Gold Leaf in "flake" form, so using sheets for this project gave me a more polished look than the flakes. Using Gold Leaf in sheet form will give you more of a foiled look...and you don't even need a foiling machine! Please note that the Gold Leaf sheets are extremely fragile. It's very easy to tear and create flakes...however, it did not give me the same outcome as other foil flakes I've used, such as Heidi Swapp or Tonic Studios. I would like to try making flakes and mixing some of the colors, such as blue and gold or pink and purple. I'll post those projects if it works! In order to remove excess foil I used a course brush to polish my stars. Then I used a piece of a swiffer dust cloth to wipe up the crumbs. It can get pretty messy if you're not careful, but it's so much fun! To finish the card I used black ink to stamp the sentiment, which is also part of the stamp set included in the Star Shaker kit. This was a quick card and I was happy to be using that lovely Mustard Seed ink while experimenting with these new COLORED Gold Leaf foil sheets! Thanks for visiting! Give foiling a try, without a foiling machine! If you don't have any dies, you could use punches to create shapes out of double sided adhesive. |
aboutAll About Sunshine is living in such a way that you shine brightly and spread joy to those around you. Giving is one of life's greatest pleasures, and I've found that giving something you made is even more heartfelt...not to mention, just plain FUN! Archives
November 2019
Categories |
 RSS Feed